Grafana is a multi-platform open source analytics and interactive visualization web application. It provides charts, graphs, and alerts for the web when connected to supported data sources.
Grafana Use By-Default Port Number Is 3000, And It's Default Configuration File Path Is /etc/grafana/grafana.ini
NGINX is a high performance web server, load balancer and reverse proxy.

In this tutorial, We Are Going To Run Grafana behind a reverse proxy.
With The Help Of Domain-Name With Nginx Webserver In Ubuntu Machine.
prerequisite :-
Domain Should Be Point with Server Ip
Web-Server Nginx
Grafana Port 3000 Should Be allowed in Firewall
Step 1) Install Grafana In Ubuntu
- If following command's will not work then go to official site ---> https://grafana.com/grafana/download
$ sudo apt-get update
$ sudo apt-get install -y adduser libfontconfig1
$ wget https://dl.grafana.com/enterprise/release/grafana-enterprise_8.4.5_amd64.deb
$ sudo dpkg -i grafana-enterprise_8.4.5_amd64.deb
- Please execute the following statements to configure Grafana to start automatically using systemd
$ sudo systemctl daemon-reload
$ sudo systemctl enable grafana-server
$ sudo systemctl start grafana-server
Step 2) Serve Grafana behind a sub path, such as http://example.com/grafana.
- Add Below Content in Grafana Configuration file /etc/grafana/grafana.ini
$ sudo vim /etc/grafana/grafana.ini
[server]
domain = tech2towards.com
root_url = %(protocol)s://%(domain)s:%(http_port)s/grafana/
serve_from_sub_path = true

- Restart Grafana for the new changes to take effect.
$ sudo systemctl restart grafana-server
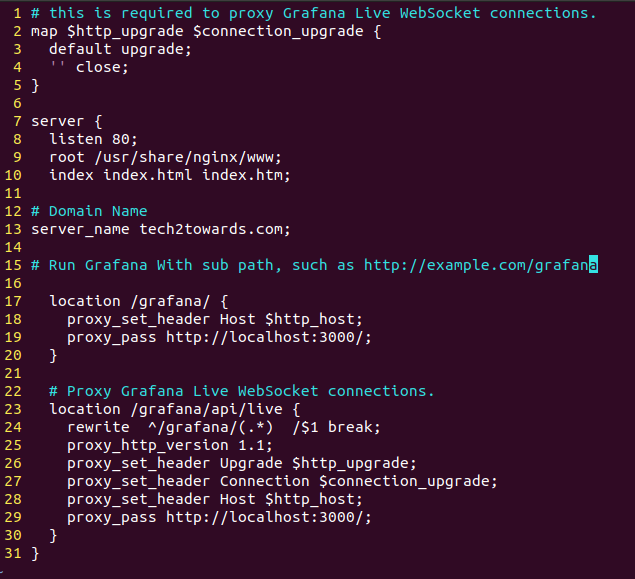
Step 3) In Your NGINX Configuration File, add the following Content:
$ sudo vim /etc/nginx/sites-available/grafana.conf
# this is required to proxy Grafana Live WebSocket connections.
map $http_upgrade $connection_upgrade {
default upgrade;
'' close;
}
server {
listen 80;
root /usr/share/nginx/www;
index index.html index.htm;
# Domain Name
server_name tech2towards.com;
# Run Grafana With sub path, such as http://example.com/grafana
location /grafana/ {
proxy_set_header Host $http_host;
proxy_pass http://localhost:3000/;
}
# Proxy Grafana Live WebSocket connections.
location /grafana/api/live {
rewrite ^/grafana/(.*) /$1 break;
proxy_http_version 1.1;
proxy_set_header Upgrade $http_upgrade;
proxy_set_header Connection $connection_upgrade;
proxy_set_header Host $http_host;
proxy_pass http://localhost:3000/;
}
}
- Link this Newly Created virtual host In Nginx sites-enabled
$ sudo ln -s /etc/nginx/sites-available/grafana.conf /etc/nginx/sites-enabled/
$ sudo systemctl restart nginx
- Let's Check on Browser http://tech2towards.com/grafana
Step 4) If You Want To Run Grafana without sub path, Ex: http://example.com/ ( Optional )
$ sudo vim /etc/nginx/sites-available/grafana.conf
# this is required to proxy Grafana Live WebSocket connections.
map $http_upgrade $connection_upgrade {
default upgrade;
'' close;
}
server {
listen 80;
root /usr/share/nginx/www;
index index.html index.htm;
server_name tech2towards.com;
location / {
proxy_set_header Host $http_host;
proxy_pass http://localhost:3000/;
}
# Proxy Grafana Live WebSocket connections.
location /api/live {
rewrite ^/(.*) /$1 break;
proxy_http_version 1.1;
proxy_set_header Upgrade $http_upgrade;
proxy_set_header Connection $connection_upgrade;
proxy_set_header Host $http_host;
proxy_pass http://localhost:3000/;
}
}

- Link this Newly Created virtual host In Nginx sites-enabled
$ sudo ln -s /etc/nginx/sites-available/grafana.conf /etc/nginx/sites-enabled/
$ sudo systemctl restart nginx
- Let's Check on Browser http://tech2towards.com/
No comments:
Post a Comment
testing